DIY Bubble Wrap Calendar
DIY Bubble Wrap Calendar
With the New Year just around the corner, every household or office will need a calendar. But what if your calendar can bring you fun everyday of the year with the use of bubble wrap?
Who doesn’t like Bubble Wrap? It is absolute fun for kids, and also for the office. In fact, it will be challenging to keep your jealous friends and co-workers from popping your bubble wrap before you do.
For this craft project you will need a computer and printer to print the calendar template. You will also require these items:
- White paper or photo paper for stiffness (paper size 8.5″ X 11″) to print calendar template (provided below)
- Seal-It™ brand stationary tape to tape each page together
- Seat-It™ brand bubble cushion
- Seat-It™ brand super glue
- Scissors
Instructions:
- Download the calendar template to your computer. Download here: https://www.bandittapegun.com/wp-content/uploads/2014/12/calendar-template.rtf
Please note depending on the size of the bubble on the bubble wrap, the template may require adjusting. - Open the calendar template on Microsoft Word and print the first page only.
- Roll-out the Seal-It™ bubble cushion over the first page and line-up the bubbles over the numbers. If the bubbles on the cushion do not line-up, proceed to step 4. If the bubbles on the cushion line-up, then proceed to step 5.
- Adjust the template on Microsoft Word by moving the borders of the columns and rows. Also try removing spaces or adding spaces appropriately. Print the first page after applying your adjustments and repeat step 3.
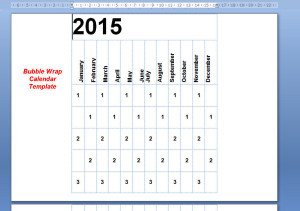
- Print all the pages of the calendar template on white paper or photo paper. The template looks similar to Image 1 below. There will be about 9 pages to print. Keep them in printed order for the next step.
- Attach each printed page by taping them on the back with Seal-It™ stationary tape. Tape them in the order printed. It should start to look like Image 2 without the bubble wrap.
- Put your calendar on a flat surface and roll the Seal-It™ bubble cushion over the full length of the calendar.
- Line up the bubble cushion over each number. The key is to have a bubble on top of each number for popping.
- Cut excess bubble cushion.
- Glue the bubble cushion into place with Seal-It™ super glue.
Now you’re done. Remember try not to pop your whole month on the first day. 🙂
If you can’t help yourself and just need more popping, check this free virtual bubble wrap web application for more fun and some measure of satisfaction: https://www.eidsvoog.com/bubblewrap.html
Here at Band-It, we wish you a Happy New Year.


